
Introduction
Several years ago, I migrated from Wordpress to Pelican for this blog. I set it up to run on GitHub Pages. I've been happy with that set up. I can modify my template as needed (which is infrequent), I can publish a post relatively easily and can write the entire post in MarkDown.
There was room for improvement though. The way I originally set it up required me to push to two different repositories every time I wrote a new blog post. Once for the MarkDown file and images, and once for the generated HTML. I wanted to eliminate the need for me to perform the second step.
Previously on this blog
Previously, this blog was broken into two repositories. One was the "source" and one was the generated HTML. In my development environment, there was also my local theme and a clone of the Pelican plugins repository, but I never formalized these into curated repositories. The generated HTML was a submodule of the source repository and was placed in the output directory. I used the following command to generate HTML each time I created a new post
pelican content --output output --settings publishconf.py
Using my settings, this would generate my HTML in the output directory. After this was generated, I'd push the content repository which had a .gitignore rule to ignore the output directory, and then I'd push the output directory.
With all of this, I had a requirements.txt document so that I could theoretically generate a post from anywhere, but I failed to keep that updated and in sync with my development environment. On more than one occasion, I tried to write a post on my laptop (not my usual development machine) and failed due to the mismatched dependencies, missing theme and missing plugins.
My development environment was fragile and couldn't be replicated with what I'd posted on GitHub. I'd also forgotten to push the output directory on more than one occasion, which was annoying.
I set out to change all of this with the following goals:
- Only a single push to GitHub would generate and deploy the HTML for this blog
- I should be able to clone the appropriate repositories and generate content locally in an emergency
- It'd be nice to have true separation between the content of the site (the MarkDown articles) and the source code
Warning
Earlier this year, I made a public post about how poorly Travis CI handles secure environment variables. The public GitHub issue hasn't been worked on yet. The two issues identified still persist:
- Secure variables can be shown via simple string manipulation from a malicious commit
- Secure variables are transferred to a third party if the repository is transferred
I feel that they still need to be addressed. They are security issues.
That said, I am using a Travis CI secure environment variable in my deployment script. It is the GitHub token used to push to the repository that contains generated HTML. I have chosen to do this because I am the only one that will be committing to the repository and will not be transferring it to a 3rd party. This is a personal site.
There are alternatives if you don't like the idea of storing your token with Travis CI. I've accepted that risk, even though I believe the issue should be fixed as soon as possible.
Improved Deployment
With my goals in place, I started with the "nice to have", because...this isn't work and I can prioritize how I want. I split my blog into three repositories:
Content
The content repository is the one repository that I commit MarkDown to. This would be the repository that triggers new deployments and would be the one that changes most frequently. Other than a single .travis.yml file, the only thing in this repository would be content that is used on the site. It'd be my MarkDown articles, associated images, and meta files (robots.txt, and verification files) but wouldn't contain any Pelican code, plugins or theme information.
Source
The source repository is where Pelican source code lives. This repository already existed in my first iteration of the blog. I needed to pull out the content and output directories and add in the theme and plugins that had only existed locally. I also updated requirements.txt to contain all of the dependencies I needed to generate the site correctly. I am pretty embarrassed to admit that I hadn't updated this file in almost three years, except to fix a plugin that had broken.
I had Pelican pinned to an old version that I hadn't used in over a year and I was missing dependencies that the Pelican plugins required. This took a lot more time to hunt down than I expected, and it's entirely my fault for not keeping this updated over the years. Fortunately, with the setup, I have to keep this updated or the site won't generate correctly.
Generated Content
The last repository is the one that holds the generated HTML for this blog. This already existed and continues to serve exactly the same purpose as before. The only difference is that the content should be pushed to this repository automatically.
Set up
GitHub Token
With the three repositories set up and content committed to them as appropriate, the next step is setting up the single Travis CI environment variable we'll need. This will be the Personal Access Token used to commit to the generated content repository.
To do this, navigate to GitHub, select your avatar in the upper right, and select "Settings". On the left, select "Developer settings" then "Personal access tokens".
Click "Generate new token" and enter your password as appropriate. Provide a useful description for your token and under the repo scope, select only public_repo. If you are planning on committing to a private repository, you will need to select the entire repo scope. Since my generated content isn't hosted in a private repository, the public_repo is enough. Select "Generate token" at the bottom.
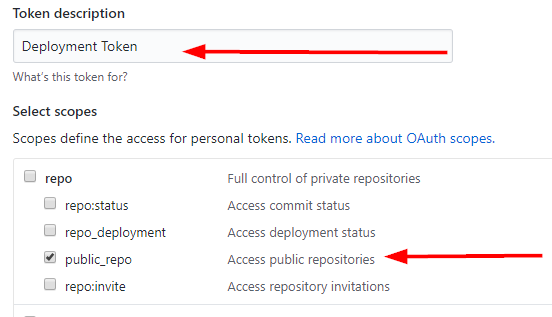
You will be presented with your token. Copy this someplace, you won't be able to access this value again.
Travis CI Environment Variable
Now, this token needs to be accessible in Travis CI. Navigate to Travis CI and find your content repository. Under "More Options", on the left select "Settings". Scroll down to "Environment Variables". In my deploy.sh script, I use the variable GITHUB_API_KEY, so that is what I'll use here too. Enter the variable name and the token GitHub provided in the previous step. Do not change "Display value in build log" to true and press "Add".

deploy.sh
The next step is configuring the deploy.sh script in the source repository. For my configuration, all that is needed is changing the GH_USERNAME variable to be the name of the user hosting the blog. Still, there is more to the script, if you find this and wish to make changes.
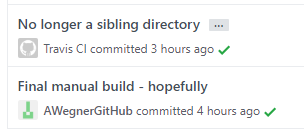
There are a few areas that may be important. The first is that pushes to the generated repository are done with the username "Travis CI" and an associated Travis CI email address. Change these as you wish. I didn't want them in my name, so that I could easily pick out which commits I did versus which ones were done automatically. The old commits in my name vs. the new automated commits look like this in GitHub.
Another important line of code is this one in the deploy script:
git push -fq https://$GH_USERNAME:$GITHUB_API_KEY@github.com/$TARGET_REPO &>/dev/null || exit $?
This line pushes the generated site to the appropriate repository using the GITHUB_API_KEY we previously generated and told Travis CI about. It also sends all output of this command to /dev/null so that the secure key won't show up in the build log. If this isn't done, Travis CI will print out the command and may or may not properly obscure it (see my previous warning, above).
The deployment ends by pinging Google and Bing with my sitemap.xml. This is an automated way of telling the two search engines that the site has been updated and they should recheck the sitemap and reindex as appropriate. It doesn't guarantee they will crawl the site immediately, but it does let them know there is an update before their next scheduled crawl.
.travis.yml
Lastly, we need to tell Travis CI what to do when there is a commit made to the content repository. The only non-content file in this repository is .travis.yml.
Right now, I have it building against Python 3.5 simply because that is the version I have installed and utilize most often. There is no reason this blog wouldn't generate against 3.6 or 3.7. I'm pretty sure all of the dependencies will also work against 2.7 right now too.
It will only build when I commit to the master branch. I don't use other branches right now, but if I ever do, they won't trigger a build.
The important bits are in the before_script and script sections.
before_script:
  - git clone https://github.com/AWegnerGithub/awegnergithub.github.io-source.git source
  - mkdir source/content
  - rsync -av --progress ./* source/content --exclude source
  - cd source
  - pip install --upgrade pip
  - pip install -r requirements.txt
script:
  - pelican content --output output --settings publishconf.py --verbose
In before_script, I clone my source repository containing all my Pelican settings into the source directory. Next, I add a content directory into this newly created source directory. I rsync my content to this directory and exclude source because you can't recursively copy a directory into itself.
Then, I get my dependancies installed. I update pip and install my requirements.txt. Finally, I execute the same pelican command I previously used and add on the verbose flag, just in case I need to troubleshoot a failed build.
Deployment is done via the deploy block, but all it is doing is calling my deploy.sh script that I covered above.
deploy:
  provider: script
  skip_cleanup: true
  script: bash deploy.sh
  on:
    branch: master
skip_cleanup is important to leave as true so that the output from the script block isn't cleaned up before we deploy.
Conclusion
This post should be the first one that is automatically deployed. I'm sure there are improvements I can and will make to my deploy.sh script or .travis.yml over time, but right now I'm happy with how it works. In testing, a deployment is taking about a minute or two from the time I push a new article. This is about how long it took previously, but now I only need to perform a single push.
I'm also happy with the split of my repositories. I was never a huge fan of having content and source code mashed together, but it worked. Now, I can keep the two separate and easily determine where everything is. Template changes are source code, article changes are content. If I make changes to anything other than content, I can trigger a rebuild within Travis CI with the click of a button. If I am just adding an article, I just need to wait a few minutes for it to be built and deployed. Hooray for automation!
One other thing this split may have done is make it easier to eventually add comments to the blog. That's been a long term goal and one that I've investigated off and on over the past three years. Since I host everything via GitHub Pages and don't have a database, comments would probably need to be done via GitHub comments somehow. I have ideas, but haven't started testing any of those yet. This split will make it easier, I think, when or if I investigate further.