
Background and goals
At work I am the software QA team lead (I haven't given myself a fancy title, but I should). As such, I spend a lot of time in JIRA tracking our bug and feature requests and in Slack working with every aspect of the company to ensure the new features work as expected and bugs are appropriately squashed. As new releases approach their release date, I start running more queries to ensure everything will be done on time.
Mini-rant: I hate JIRA's UI. It's slow, clunky and makes rolling things up as I need them unnecessarily complicated.
Despite that complaint, JIRA is good because it has so much flexibility on the web UI and, even better, it has an API I can use to automate the queries I use. So, that's what I did. Our last release was larger and more complex than the ones we've done in the last year (since I started). The reason for this complexity was that we needed to coordinate our updates with those of our third party billing platform. Messing up how we bill customers is a great way to get into a "discussion" with the higher ups at any company.
In this release, I started poking around JIRA's API. With very little work, I'd managed to automatically run the queries that were taking a significant amount of time in the UI. I formatted these nicely and started posting the results in Slack during our update calls so that all of the developers were on the same page. From my point of view, these calls were more efficient. After the release was pushed out, I decided to see what it'd take to make these queries available to everyone via a Slack slash command.
This article will talk about the process I went through, give a small tutorial for a basic command, explain how I tested locally, provide a few tips that deal with pitfalls I encountered and explain how I deployed this to Google's cloud platform.
Writing the Flask app
Slack's slash apps do not run on Slack's platform. When a slash command is issued, it calls a predefined URL and awaits a response. My experience is with Python. I've used both Flask and Django web frameworks. These commands will be small and don't need any of the back end batteries that Django includes, so I chose to use Flask to handle the commands I wanted to create.
Slash Pitfall 1: Timeouts
The first pitfall that I encountered was before I even started writing code. Slack only allows a slash command 3000 milliseconds to respond, before it times out. Unfortunately, connecting to JIRA and running the series of queries I need takes a minimum of 5 seconds. Fortunately, the workaround for this was simple: Use delayed responses by responding to the initial command with a confirmation message of some kind, then perform the work and respond again using the Slack passed response_url.
Sample Application
The application code below is a simple toy example. It will respond to the command "/hello-world" and then reply again after a few seconds, to simulate the delayed responses I needed.
from functools import wraps
from threading import Thread
import asyncio
from time import sleep
import requests
from flask import abort, Flask, jsonify, request
app = Flask(__name__)

SLACK_VERIFICATION_TOKEN = "" # Put your token here
SLACK_TEAM_ID = "" # Put your team ID here

def validate_request(f):
    """Decorator to validate request is from slack"""
    @wraps(f)
    def check_request_validity(*args, **kwargs):
        if not is_request_valid(request):
            abort(400)
        return f(*args, **kwargs)
    return check_request_validity

def is_request_valid(request):
    """Validate a request is from Slack"""
    is_token_valid = request.form['token'] == SLACK_VERIFICATION_TOKEN
    is_team_id_valid = request.form['team_id'] == SLACK_TEAM_ID
    return is_token_valid and is_team_id_valid


def slack_command_response(response_url,
                           response_text,
                           response_type='ephemeral'):
    """Respond to a Slack command"""
    if response_type not in ('ephemeral', 'in_channel'):
        response_type = 'ephemeral'
    data = {
        'response_type': response_type,
        'text': response_text
    }
    requests.post(response_url, json=data)


def start_command_worker(loop):
    """Switch to new event loop and run forever"""
    asyncio.set_event_loop(loop)
    loop.run_forever()


command_loop = asyncio.new_event_loop()
command_worker = Thread(target=start_command_worker, args=(command_loop,))
command_worker.start()


def hello_world(response_url):
    """Sends "Hello World!" to Slack after 5 seconds"""
    sleep(5)
    slack_command_response(response_url,
                           response_type='ephemeral',
                           response_text="Hello World!")


@app.route('/hello-world', methods=['POST'])
@validate_request
def command_hello_world(**kwargs):
    command_loop.call_soon_threadsafe(hello_world,
                                      request.form['response_url'])
    return jsonify(
        response_type='ephemeral',
        text="Waiting to greet you...",
    )

if __name__ == '__main__':
    # This is used when running locally. Gunicorn is used to run the
    # application on Google App Engine. See entrypoint in app.yaml.
    app.run(host='127.0.0.1', port=5000, debug=True)
Sample Application Walkthrough
The only interesting thing in the imports here is the inclusion of asyncio. Since I need to fire off an immediate response and then do the "real work", I'll funnel that work into worker threads. I'm also including functools.wraps because I'm making a decorator for validating a request is coming from Slack. For a single command, this type of decorator isn't needed, but I have multiple Slack slash commands in the real application. I figured it'd be helpful to show here too. This application will also need the requests library.
Speaking of that decorator, the first function encountered in the code is validate_request. This will be the decorator that ensures a request came from Slack. It calls is_request_valid, which compares the passed token and team_id to the values we've previously saved. If they match, the request is valid. If they don't match, the request is invalid. This application is only for my team and won't be distributed elsewhere.
Next up is slack_command_response, which is used to send text back to Slack. It will respond to the response_url parameter. This is passed by Slack and is part of the request.form object Flask receives. This can be found at request.form['response_url']. It will reply either ephemeral (default) or in_channel. The first will reply only to the user and will hide the slash command that was used. The second will reply to the entire channel and will leave the slash command visible to all.
Starting the worker thread is done in start_command_worker and the next three lines. This will fire up a thread that listens forever. It will not take place on the main thread, which allows Flask to respond immediately and then perform work in the background. Remember, this is a small application and will work for the scale me and my team will be using this on. This is most certainly not designed for a huge number of users constantly using it.
Now it's time to get to the real work. hello_world and command_hello_world. If you've used Flask before, you can see that command_hello_world will be the function associated with a user hitting http:\\server.tld\hello-world with a POST request. Slack only sends POST requests, so I don't care about GET methods. In command_hello_world, we send a call to the command worker thread, telling it to call hello_world and then pass the response_url as a parameter. The function immediately returns a response to Slack telling the user to wait.
In hello_world, the function sleeps for a few seconds before sending a response back to the passed response_url. This sleep is to emulate "real work" being done. In my case, it's five seconds of queries to JIRA to gather and format all of the data I want to return.
Finally, this can run locally by firing up Flask. I tested with this command:
FLASK_APP=jira-slack-integration.py flask run
When deploying to Google App Engine, the main function won't be utilized. I cover that below.
Testing the application
Now it's time for everyone's favorite part of development: TESTING!
Slack set up - Part 1
To test a Slack application, though, some set up within Slack is needed: create a Slack Application, set up and gather tokens, and set up slash command end points.
- First, create a new Slack App. Fill out the name and select the appropriate workspace.
- After submission, it redirects to a basic information section about the new application. Scroll down to "App Credentials". Copy the
Verification Tokenand put it in theSLACK_VERIFICATION_TOKENvariable in the Flask application. - Open Slack in the browser, sign in, and then open the web console. In Chrome, do this with CTRL+SHIFT+I or with F12 in FireFox. View the page source and search for
team_id. It will look something like this:"T083XXXX". Copy this value toSLACK_TEAM_IDin the Flask application.
ngrok set up
Before slash commands can be set up in Slack, you need a development environment and an easy way to access our development server. One option is to punch holes in the router's firewall to point to your development machine. This works if you are on a home network and you'll be the only machine running the development server. It's not so easy if your set up is more complicated or infrastructure is outside of your control.
I choose to use ngrok instead. This application provides you with a free, secure and public URL to your local development environment without worrying about your NAT or firewall settings.
- Sign up. After that the four steps to complete setup are shown
- Download ngrok. There are downloads for a variety of operating systems. This includes Ubuntu, which I use for my work related development work.
- Unzip ngrok to any location:
unzip /path/to/ngrok.zipThis places anngrokbinary in the selected location. - Set up the authentication token. This is a one time step. This will create a
~/.ngrok2/ngrok.ymlfile. - Start
ngrok. If you're using the script from above, Flask should run on the local machine on port 5000. The command to startngrokto point to the Flask server is:./ngrok http 5000. In another command prompt start the Flask application.
Slack set up - Part 2
ngrok provides a public URL. In the screenshot below, my URL is https://1eed8eae.ngrok.io.
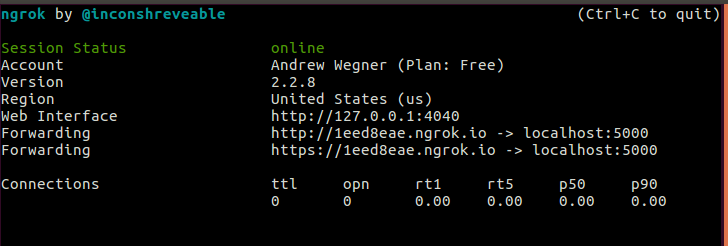
Important Note: This changes every time ngrok is started.
At this point, I can visit https://1eed8eae.ngrok.io/hello-world in my browser and get an error message because I didn't configure it to support GET requests.
- Go back to Slack and the management area where the new application was set up.
- Select "Slash Commands"
- Select "Create New Command"
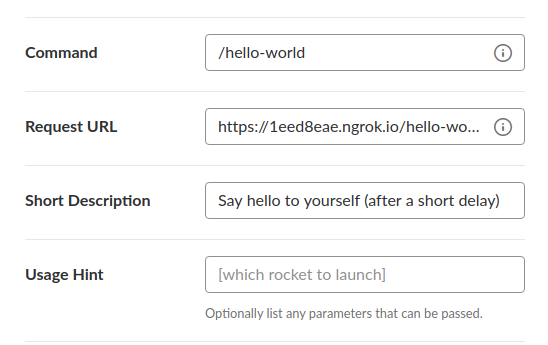
- Put in the command users will use within Slack. This can be anything.
- Enter the request URL. This will be
https://1eed8eae.ngrok.io/hello-worldwith this example - Provide a description of the command
- Add a usage hint. This is useful if you are passing parameters to the command.
- Press save
The slash command is now set up. The last step is installing the application. Go back to "Basic Information" and expand "Install your app to your workspace" then press the green "Install App to Workspace" button. You'll be presented with an oAuth Access Token. For this example application, it's not needed.
Now go into any channel in Slack and use the new /hello-world command.
Important Note: If/when you shut down and restart ngrok, you'll get a new end point. The slash command will need to be modified to point to this new request URL to continue to function. These changes will not be required once the application is deployed to Google's App Engine.
Deploy application to App Engine
This project requires the use of the flexible app engine environment (vs. standard environment). The biggest reason for this is due to the network requirements. It seems that anything other than Node.js has networking restrictions, and the sample application needs to connect to Slack and my application also needed to connect to JIRA. Another downside of the standard environment is that it only supports Python 2.7. I don't believe there is anything in the example application that would break on Python 2, but there are a few Python 3 specific things I used in my real application (f strings, are one).
The flexible environment isn't free though. It's always on. The sample application and my real application are so small and used by so few people that it costs less than fifty cents a day. This isn't a huge deal when the rest of our Google cloud bill exceeds that by a couple orders of magnitude, but it is something to consider if you are just running this as a small side thing. It's not free.
Set up gcloud SDK
Due to the size of this application, the quick start tutorial that Google provides is perfect.
- Using the Google Cloud Platform console, create a new App Engine project and enable billing (billing must be enabled). This can be done from here
- Download the Google Cloud SDK
- Extract this to any location. To add it to the path, run
./google-cloud-sdk/install.sh. If this isn't done, the full path needs to be in allgcloudcommands. - Initialize the SDK by running
gcloud initand follow the prompts on screen. You'll need access to a browser for this step as you'll be authorizing your account using oAuth.
Set up app.yaml
With gcloud set up on your development machine, there is one last step to do: Configuring the app.yaml file.
This file contains information on the type of environment you'll be deploying to. Create and save an app.yaml file in the same directory as the Flask application. For this example, the Flask application is in a file saved as example-script.py
runtime: python
env: flex
entrypoint: gunicorn -b :$PORT example-script:app

runtime_config:
  python_version: 3

manual_scaling:
  instances: 1
resources:
  cpu: 1
  memory_gb: 0.5
  disk_size_gb: 10
Other than the entrypoint line, this is the example app.yaml provided by Google. example-script is the name of the file that contains the Flask application.
Deploy to Google
Finally, it's time to deploy this application to Google. From within the same directory where example-script.py resides, run:
gcloud app deploy
Wait a few minutes for the deployment to occur. When it's complete, the command prompt will say so and provide a URL where the application is accessible.
The last thing that needs to be done, is repointing the slash commands to this new location. With it deployed to Google's Cloud Platform, the ngrok provided URLs need to be changed. The endpoints remain the same though.
Once the slash commands are changed and saved, test them out and enjoy the new slash commands hosted on Google's App Engine.