
Introduction
It's been a year and a half since I set up GitLab. In that time I've used it to store my personal code, keep track of features I want to add to my own projects, and generally loved it. One thing I haven't done though, is play with the CI/CD features. I've been wanting to, but never got around to it.
To utilize the CI/CD features, you need to set up a GitLab runner
Set up
Docker
I'll be running my runners in Docker containers. There are other options, but for my home environment, this is easiest to set up and maintain.
Let's start by installing Docker:
sudo apt-get install apt-transport-https ca-certificates curl software-properties-common -y
curl -fsSL https://download.docker.com/linux/ubuntu/gpg | sudo apt-key add -
sudo add-apt-repository "deb [arch=amd64] https://download.docker.com/linux/ubuntu $(lsb_release -cs) stable"
sudo apt update
sudo apt install docker-ce -y
This is going to add the Docker repository and install the community edition.
GitLab Runner
Once Docker is installed and working, we can install the GitLab runner.
wget -O /usr/local/bin/gitlab-runner https://gitlab-runner-downloads.s3.amazonaws.com/latest/binaries/gitlab-runner-linux-amd64
chmod +x /usr/local/bin/gitlab-runner
useradd --comment 'GitLab Runner' --create-home gitlab-runner --shell /bin/bash
gitlab-runner install --user=gitlab-runner --working-directory=/home/gitlab-runner
gitlab-runner start
This is downloading the install package. Then it adds a new user, that the runner will run as. This is a nice security precaution to limit what the runner has access to on the system. It's not full security, but it does allow me to restrict what that particular user has access to on the server.
Then the runner is started.
Next the runner needs to be registered. Log into GitLab, and navigate to the project that will be using this runner. It should be available at this link:
https://url.to.your.gitlab.install/<account>/<repo>/settings/ci_cd
Grab the GitLab CI token. That is needed in the next step. Run the gitlab-runner register command, and fill in your values as required.
$ gitlab-runner register
Please enter the gitlab-ci coordinator URL (e.g. https://gitlab.com/):
https://url.to.your.gitlab.install/

Please enter the gitlab-ci token for this runner:
[redacted]]

Please enter the gitlab-ci description for this runner:
[my-runner]: python-runner

Please enter the gitlab-ci tags for this runner (comma separated):
python
Registering runner... succeeded                     runner=66m_339h

Please enter the executor: docker-ssh+machine, docker, docker-ssh, parallels, shell, ssh, virtualbox, docker+machine, kubernetes:
docker

Please enter the default Docker image (e.g. ruby:2.1):
alpine:latest

Runner registered successfully. Feel free to start it, but if it's running already the config should be automatically reloaded!
My experience with Docker is limited, so I am using the latest alpine version. I'm sure there are better ones to use for a simple Python application, but this works for me and I'm not concerned about the absolute fastest CI/CD pipeline on my server.
Using the CI/CD pipeline
At this point, the GitLab runner is registered to a single project and is ready to use. You can enable your project to use this pipeline by adding a .gitlab-ci.yml file to the root of your repository.
I used it to set up the following pipeline.
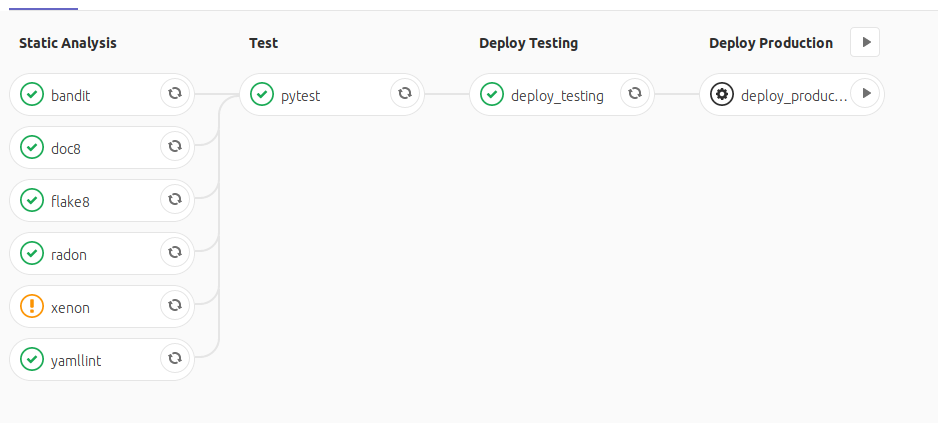
This pipeline has 4 stages.
Static Analysis
In the Static Analysis phase, I run various analysis tools over my code. The goal here is to ensure that my code, YAML documents, and documentation are easy to read and use.
You'll notice the xenon task has a warning in the image. I have the settings pretty strict in this pipeline, where I allow a very low Cyclomatic Complexity. In this project, I have one function that is just barely failing my strict settings. I have allowed the pipeline to continue if this one particular task fails.
I could either increase the allowed complexity in the code base to ignore the warning. Alternatively, I could not allow the pipeline to proceed until I fix this function. This was one of those instances where it hasn't been worth it to refactor the code, but I want to be reminded I should fix it, so I allow the pipeline to proceed and show me the error.
Test
The Test phase should be fairly self explanatory. It's the stage where I run my test suite. It will only run if the Static Analysis phase completes successfully (or I allow a specific job to fail, in the case of the xenon task).
Deploy Testing
Once the test suite has completed successfully, I deploy the package to the test instance of PyPI. This ensures that I have a successful build and deploy.
Deploy Production
Deployment to production is a manual step. I did this because I don't always want to push changes to production PyPI. This is especially true if I'm only making small fixes - such as white space changes. I don't want to skip the entire CI process, but I also don't want to push out to production for something so minor.
Environment set up
One of my biggest complaints about the Travis CI integration with GitHub is how you can't trust environment variables in Travis CI. Since I control the server that this runner is connected to, I have no problem adding environment variables into GitLab.
In the project, I was able to add these by going to Settings->CI/CD and expanding the Variables section. I needed to store credentials for both the test and production instances of PyPI.
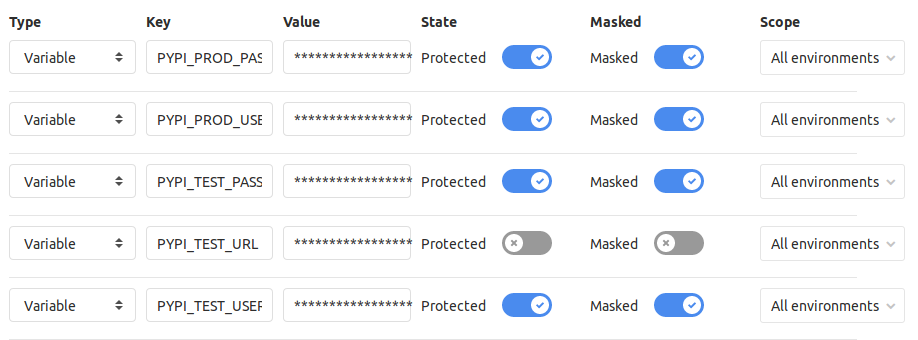
With these added, they are now accessible by my .gitlab-ci.yml file.
.gitlab-ci.yml
The script I use to build the pipeline is as follows:
image: "python:3.7"

.python-tag:
  tags:
    - python

before_script:
  - python --version
  - pip install .[dev]

stages:
  - Static Analysis
  - Test
  - Deploy Testing
  - Deploy Production

flake8:
  stage: Static Analysis
  extends:
    - .python-tag
  script:
    - flake8 --max-line-length=120

doc8:
  stage: Static Analysis
  extends:
    - .python-tag
  allow_failure: true
  script:
    - doc8 --max-line-length=100 --ignore-path=docs/_build/* docs/

yamllint:
  stage: Static Analysis
  extends:
    - .python-tag
  allow_failure: true
  script:
    - yamllint .

bandit:
  stage: Static Analysis
  extends:
    - .python-tag
  allow_failure: true
  script:
    - bandit -r -s B101 my_package

radon:
  stage: Static Analysis
  extends:
    - .python-tag
  script:
    - radon cc my_package/ -s -a -nb
    - radon mi my_package/ -s -nb

xenon:
  stage: Static Analysis
  extends:
    - .python-tag
  allow_failure: true
  script:
    - xenon --max-absolute B --max-modules B --max-average B my_package/

pytest:
  stage: Test
  extends:
    - .python-tag
  script:
    - pytest

deploy_testing:
  stage: Deploy Testing
  extends:
    - .python-tag
  variables:
    TWINE_USERNAME: $PYPI_TEST_USERNAME
    TWINE_PASSWORD: $PYPI_TEST_PASSWORD
  script:
    - python setup.py sdist
    - twine upload --repository-url $PYPI_TEST_URL dist/*

deploy_production:
  stage: Deploy Production
  extends:
    - .python-tag
  when: manual
  variables:
    TWINE_USERNAME: $PYPI_PROD_USERNAME
    TWINE_PASSWORD: $PYPI_PROD_PASSWORD
  script:
    - python setup.py sdist
    - twine upload dist/*
.gitlab-ci.yml explanation
There are a few areas that I feel need to be explained in the script above.
Tags
.python-tag:
  tags:
    - python
This section is a template that is used to add the python tag to a job step. The Runner will only run tasks that have a tag you assigned to it. This is useful if you are building across multiple operating systems or across multiple languages. You don't want a runner set up to test against a Windows environment picking up tasks for a Linux environment. In my case, everything is being run for a single runner.
In each step, I need to add this:
extends:
  - .python-tag
With this, the python tag will be automatically applied to the task. For a simple pipeline like mine, it may seem like overkill, but it's useful if I want to force other tags or steps.
Allow failures
xenon:
  stage: Static Analysis
  extends:
    - .python-tag
  allow_failure: true
  script:
    - xenon --max-absolute B --max-modules B --max-average B my_package/
I previously mentioned that I allowed the xenon step to fail. This is accomplished with the allow_failure: true setting you see here. Since this setting is in place, the pipeline will proceed even if this single task fails.
Manual deployment
deploy_production:
  stage: Deploy Production
  extends:
    - .python-tag
  when: manual
  variables:
    TWINE_USERNAME: $PYPI_PROD_USERNAME
    TWINE_PASSWORD: $PYPI_PROD_PASSWORD
  script:
    - python setup.py sdist
    - twine upload dist/*
The deploy to production is a manual step. I use when: manual to ensure this step doesn't occur automatically. At some point in the future, this project will be stable and won't have minor fixes any longer and I'll want to automatically deploy to production without interaction. When I reach that point, I'll just need to remove this line. As long as the preceding steps succeed, this one will be performed as well.
Next Steps
Now that I've set this up and come to rely on it, I think my next steps will be converting my home Minecraft Server to use the GitLab pipelines to automatically deploy updates. Look for that post in the future.